This chapter contains the following topics:
Introduction to Serial Number Reports
Printing Serial Numbers by Customer Report
Printing Serial Numbers by Item Report
Printing Serial Numbers by Vendor Report
Printing Serial Numbers on Loan Report
Printing Loan/Rentals by Customer
This chapter explains four of the reports that are available if you are using serial numbers.
The four reports are:
| • | Serial Numbers by Customer |
| • | Serial Numbers by Item |
| • | Serial Numbers by Vendor |
| • | Serial Numbers on Loan |
One other serial number report, the Flooring Report, is described in the Flooring Report chapter.
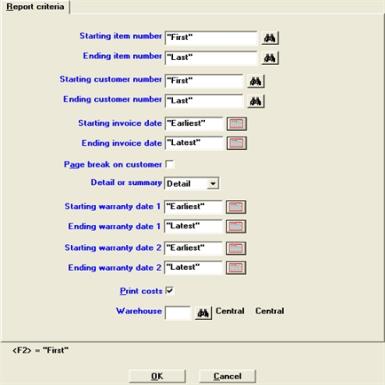
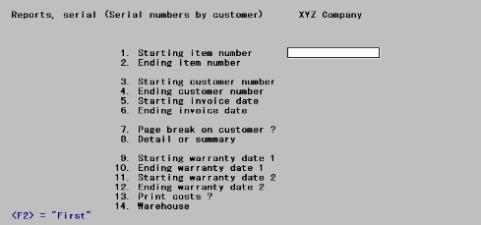
The Serial Numbers by Customer Report
shows sold serialized inventory, organized by customer. This report can be used to highlight a range of warranty expiration dates. The age of each sold serial number is also shown, based on the invoice date.
The Serial Numbers by Item Report
shows current unsold or sold serialized inventory, organized by item number.
The Serial Numbers by Vendor Report
shows current unsold or sold serialized inventory, organized by vendor. This report shows the age of each serial number, based on the serial number receiving date, for the specified range of vendors. The last activity for each serial number is also shown.
The Serial Numbers on Loan Report
shows serialized items that have been loaned out. The report shows unsold serial numbers that are on loan. Because this report is printed in order by the Reference field, you can track loans by salesperson, customer name, or any method convenient for you.
The Serial numbers by customer report shows sold serialized inventory, organized by customer. This report can be used to highlight a range of warranty expiration dates. The age of each sold serial number is also shown, based on the invoice date.
Select
Select Serial numbers by customer from the Reports, serial menu.
Graphical Mode
The following screen appears:
Character Mode
The following screen appears:
|
Note |
The above screen is for multi-warehousing. If you are not using multi-warehousing, you will not see the Warehouse field. |
Enter the information as follows:
Ending item number
Enter the range of item numbers of the serialized items to print on the report. Press <F2> for "First" and "Last" item numbers. Follow the screen instructions.
|
Format |
Up to 15 digits |
|
Example |
Press <F2> for both fields |
Ending customer number
Enter the range of customer numbers to be included in the report. Press <F2> for the "Earliest" and "Latest" customer numbers. Follow the screen instructions.
|
Format |
Up to 12 digits |
|
Example |
Press <F2> for both fields |
Ending invoice date
Enter the range of invoice dates for which serial numbers are to be printed. Follow the screen instructions.
|
Format |
MMDDYY |
|
Example |
Press <F2> for both fields |
Check this box if you want to start a new page in the report for each customer who has serialized items. You may press <Enter> to default to unchecked.
|
Format |
Check box where checked is yes and unchecked is no. The default is unchecked |
|
Example |
Press <Enter> to accept the default |
The detail report shows the selected items for each customer you specify. The summary report shows totals only for each customer.
In character mode enter D for a detail report, or enter S for a summary report.
|
Format |
Drop down list with the options of Detail and Summary. The default is Detail |
|
Example |
Press <Enter> to accept the default |
Ending warranty date 1
Enter the range of dates of the first warranty expiration for which serial numbers are to print. Press <F2> for "Earliest" and "Latest" warranty dates. Follow the screen instructions.
|
Format |
MMDDYY |
|
Example |
Press <F2> for both fields |
Ending warranty date 2
Enter the range of dates of the second warranty expiration for which serial numbers are to print. Press <F2> for "Earliest" and "Latest" warranty dates. Follow the screen instructions.
|
Format |
MMDDYY |
|
Example |
Press <F2> for both fields |
Check this box if you want to print the cost on the report, or leave it unchecked and the cost will not be printed on the report.
|
Format |
Check box where checked is yes and unchecked is no. The default is checked |
|
Example |
Press <Enter> to accept the default |
Options
If you are using multi-warehousing, enter the warehouse code for which you want the report printed, or use one of the options:
|
<Enter> |
For Central warehouse |
|
<F5> |
For All warehouses |
|
Format |
Up to two characters, or use the option |
|
Example |
Press <Enter> for the Central warehouse |
Select OK to print the report or Cancel to return to the menu.
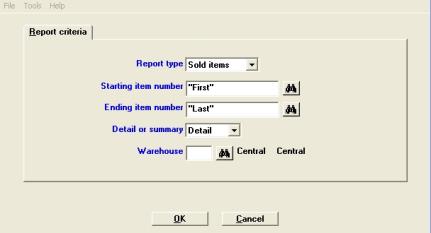
The Serial numbers by item report shows current unsold or sold serialized inventory, organized by item number.
Select
Serial numbers by item from the Reports, serial menu.
Graphical Mode
The following screen appears:
Character Mode
|
Note |
The above screen is for multi-warehousing. If you are not using multi-warehousing, you will not see the Warehouse field. |
Enter the information as follows:
Enter the report type for items to be printed on the report, Unsold items if you select that the unsold items to be printed or Sold items for the sold items. Follow the screen instructions.
Options
You may use the following options:
|
Unsold items |
To select the Unsold items report |
|
Sold items |
To select the Sold items report |
|
Format |
Drop down list with one of the choices above. The default is Sold items |
|
Example |
Select Unsold items and then press <Enter> |
Ending item number
Enter the range of item numbers of the serialized items to print on the report. Press <F2> for "First" and "Last" item number. Follow the screen instructions.
|
Format |
Up to 15 digits, or use the option |
|
Example |
Press <F2> for both fields |
Select Detail for a detail report, or Summary for a summary report.
The detail report shows the selected items for each customer you specify. The summary report shows totals only for each customer. A detail report includes information on each unsold or sold serial number for the range of item numbers specified. A summary report shows totals only for each item for the range of item numbers specified.
|
Format |
Drop down list. The default is Detail |
|
Example |
Press <Enter> to accept the default |
If you are using multi-warehousing, enter the warehouse code for which you want the report printed.
Options
You may also use one of the options:
|
<Enter> |
For Central warehouse |
|
<F5> |
For All warehouses |
|
Format |
Up to two characters, or use the option |
|
Example |
Press <Enter> for the Central warehouse |
Select OK to print the report or Cancel to return to the menu.
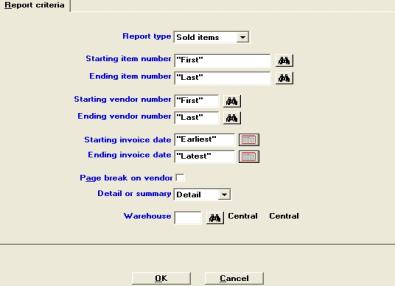
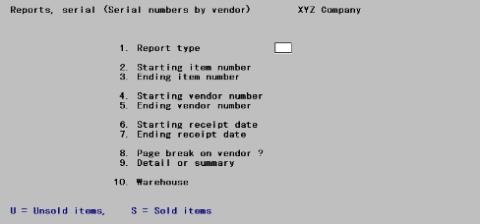
The Serial numbers by vendor report shows current unsold or sold serialized inventory, organized by vendor. This report shows the age of each serial number, based on the serial number receiving date, for the specified range of vendors. The last activity for each serial number is also shown.
Select
Serial numbers by vendor from the Reports, serial menu.
Graphical Mode
The following screen appears:
Character Mode
The following screen appears:
|
Note |
The above screen is for multi-warehousing. If you are not using multi-warehousing, you will not see the Warehouse field. |
Enter the information as follows:
Enter the report type for items to be printed on the report, Unsold items if you select that the unsold items to be printed or Sold items for the sold items. Follow the screen instructions.
|
Format |
Drop down list. The default is Sold items |
|
Example |
Select Unsold items and then press <Enter> |
Ending item number
Enter the range of item numbers of the serialized items to print on the report or press <F2> for "First" and "Last" item numbers. Follow the screen instructions.
|
Format |
Up to 15 digits, or use the option |
|
Example |
Press <F2> for both fields |
Ending vendor number
Enter the range of vendor numbers to be included in the report or press <F2> for "First" and "Last" vendor number. Follow the screen instructions.
|
Format |
Up to six digits, or use the option |
|
Example |
Press <F2> for both fields |
Ending receipt date
or
Starting invoice date and
Ending invoice date
The label for this field is dependent on the selection for the Report type field. If it is an unsold item, then it is the receipt date range. If it is sold then the invoice date range.
Enter the range of dates for which serial numbers are to print or press <F2> for the "Earliest" and "Latest" dates. Follow the screen instructions.
|
Format |
MMDDYY |
|
Example |
Press <F2> for both fields |
Check this box if you want to start a new page in the report for each vendor who has serialized items. You may press <Enter> to default to unchecked.
|
Format |
Check box where checked is yes and unchecked is no. The default is unchecked |
|
Example |
Press <Enter> to accept the default |
The detail report shows the selected items for each vendor you specify. The summary report shows totals only for each vendor.
In character mode enter D for a detail report, or enter S for a summary report.
|
Format |
Drop down list with the options of Detail and Summary. The default is Detail |
|
Example |
Press <Enter> to accept the default |
If you are using multi-warehousing, enter the warehouse code for which you want the report printed.
Options
You may also use one of the options:
|
<Enter> |
For Central warehouse |
|
<F5> |
For "All" warehouses |
|
Format |
Up to two characters, or use the option |
|
Example |
Press <Enter> for Central warehouse |
Select OK to print the report or Cancel to return to the menu.
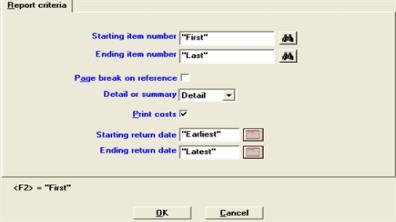
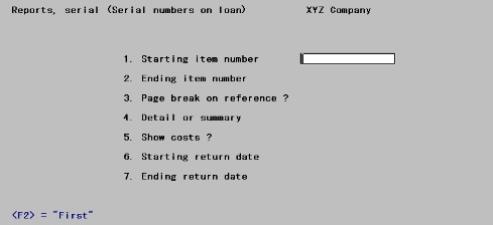
The Serial numbers on loan report shows serialized items that have been loaned out. The report shows unsold serial numbers that are on loan. Since this report is printed in order by the Reference field, you can track loans by salesperson, customer name, or any method convenient for you.
Select
Serial numbers on loan from the Reports, serial menu.
Graphical Mode
The following screen displays:
Character Mode
The following screen displays:
Enter the information as follows:
Ending item number
Enter the range of item numbers of the serialized items to print on the report or press <F2> for "First" and "Last" item numbers. Follow the screen instructions.
|
Format |
Up to 15 digits, or use the option |
|
Example |
Press <F2> for both fields |
Check this box if you want to start a new page in the report for each reference. You may press <Enter> to default to unchecked.
|
Format |
Check box where checked is yes and unchecked is no. The default is unchecked |
|
Example |
Press <Enter> to accept the default. |
The detail report shows the selected items for each reference you specify. The summary report shows totals only for each reference.
In character mode enter D for a detail report, or enter S for a summary report.
|
Format |
Drop down list with the options of Detail and Summary. The default is Detail |
|
Example |
Press <Enter> to accept the default. |
Answer Y if you wish to print the item costs from Serial Numbers for the serialized items on the report. Otherwise, answer N.
|
Format |
Check box where checked is yes and unchecked is no. The default is checked |
|
Example |
Press <Enter> to accept the default. |
Ending return date
Enter the range of loan return dates of loaned serial numbers to be included on the report for the range of items specified or press <F2> for "Earliest" and "Latest" item numbers. Follow the screen instructions.
|
Format |
MMDDYY |
|
Example |
At both fields press <F2> and then press <Enter> |
A sorting process takes place prior to printing (or screen display) of the report.
Select OK to print the report or Cancel to return to the menu.
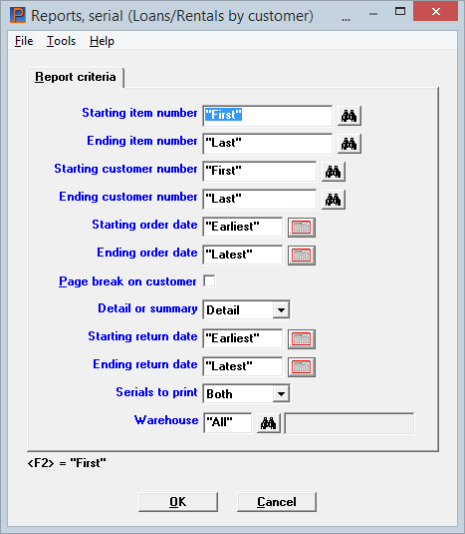
Serialized items can be loaned and rented to customers. This report provides a list of those customers who have loaned or rented serialized items.
Select
Loans/Rentals by customer from the Reports, serial menu.
Graphical Mode
The following screen displays:
Character Mode
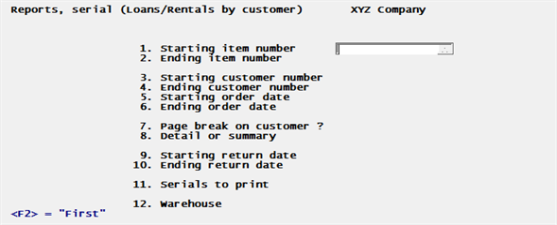
Enter the following fields:
Ending item number
Enter the range of item numbers of the loan/rental items to print on the report or press <F2> for "First" and "Last" item numbers. Follow the screen instructions.
|
Format |
Up to 15 digits, or use the option |
|
Example |
Press <F2> for both fields |
Ending customer number
Enter the range of customer numbers that have used serialized items to print on the report or press <F2> for "First" and "Last" customer numbers. Follow the screen instructions.
|
Format |
Up to 12 digits, or use the option |
|
Example |
Press <F2> for both fields |
Ending order date
Enter the range of order dates for which have loaned or rented serialized items are to be printed. Follow the screen instructions.
|
Format |
MMDDYY |
|
Example |
Press <F2> for both fields |
Check this box if you want to start a new page in the report for each customer who has a loaned or rented serialized items. You may press <Enter> to default to unchecked.
|
Format |
Check box where checked is yes and unchecked is no. The default is unchecked |
|
Example |
Press <Enter> to accept the default |
The detail report shows the selected items for each customer you specify. The summary report shows totals only for each customer.
In character mode enter D for a detail report, or enter S for a summary report.
|
Format |
Drop down list with the options of Detail and Summary. The default is Detail |
|
Example |
Press <Enter> to accept the default |
Ending return date
Enter the range of loan return dates of loaned or rented serial numbers to be included on the report for the range of items and customers specified or press <F2> for "Earliest" and "Latest" item numbers. Follow the screen instructions.
|
Format |
MMDDYY |
|
Example |
At both fields press <F2> and then press <Enter> |
In this field you may specify Both loaned and rented items, Loans for only loaned serialized items or Rentals for only rented serialized items .
In character mode enter L for loans R for rentals, or B for Both.
|
Format |
Drop down list. The default is Both |
|
Example |
Press <Enter> to accept the default |
This field can only be entered if you are using multi-warehousing.
Options
If you are using multi-warehousing, enter the warehouse code for which you want the report printed, or use one of the options:
|
<Enter> |
For Central warehouse |
|
<F5> |
For "All" warehouses |
|
Format |
Up to two characters, or use the option |
|
Example |
Press <Enter> for the Central warehouse |
Select OK to select a printer to print the report or Cancel to return to the menu without printing.
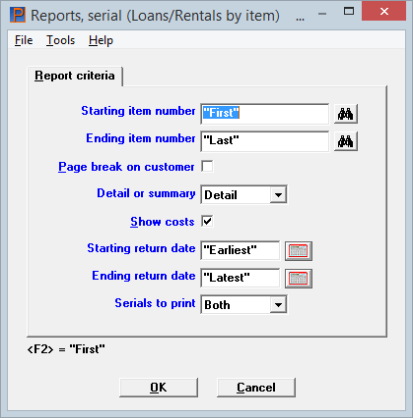
Serialized items can be loaned and rented. This report provides a list of those serialized items that have been loaned or rented.
Select
Loans/Rentals by item from the Reports, serial menu.
Graphical Mode
The following screen displays:
Character Mode
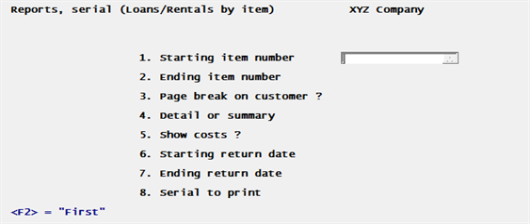
Enter the following fields:
Ending item number
Enter the range of item numbers of the loan/rental items to print on the report or press <F2> for "First" and "Last" item numbers. Follow the screen instructions.
|
Format |
Up to 15 digits, or use the option |
|
Example |
Press <F2> for both fields |
Check this box if you want to start a new page in the report for each customer who has a loaned or rented serialized items. You may press <Enter> to default to unchecked.
|
Format |
Check box where checked is yes and unchecked is no. The default is unchecked |
|
Example |
Press <Enter> to accept the default |
The detail report shows the selected items for each customer you specify. The summary report shows totals only for each customer.
In character mode enter D for a detail report, or enter S for a summary report.
|
Format |
Drop down list with the options of Detail and Summary. The default is Detail |
|
Example |
Press <Enter> to accept the default |
Check this box if you want to print the cost on the report, or leave it unchecked and the cost will not be printed on the report.
|
Format |
Graphical: Check box where checked is yes and unchecked is no. The default is checked Character: Either Y or N. The default is Y |
|
Example |
Press <Enter> to accept the default |
Ending return date
Enter the range of loan return dates of loaned or rented serial numbers to be included on the report for the range of items and customers specified or press <F2> for "Earliest" and "Latest" item numbers. Follow the screen instructions.
|
Format |
MMDDYY |
|
Example |
At both fields press <F2> and then press <Enter> |
In this field you may specify Both loaned and rented serialized items, Loans for only loaned serialized items or Rentals for only rented serialized items .
In character mode enter L for loans R for rentals, or B for Both.
|
Format |
Drop down list. The default is Both Character: Either L, Y or B. There is no default |
|
Example |
Press <Enter> to accept the default |
Select OK to select a printer to print the report or Cancel to return to the menu without printing.